Excel is a powerhouse for data assessment and data management. As a data entry expert, you must know all the key formulas in Excel in order to handle your day-to-day data operations. But there is no end to learning.
If you are looking for some Excel shortcuts for insert row, you landed on the right page. We will talk about three keyboard shortcuts that can help you insert rows in Excel.
Let’s get it started!
Excel Limits to 1048576 Rows
From the Excel 2007 version onwards, the row limit is extended to 1,048,576 rows. However, this limit is enough for handling complex data. With the excellent management of rows, you can outline the Excel row limitations.
Increasing the usability of Excel rows is the thing you need to consider first. If the dataset is large and exceeds the row limits, you need to use Power Query or any other external data source like Python or R.
Why Consider Excel Shortcuts for Insert Row
Excel is an inclusive data management platform. It’s because you can use it via your mouse pointer as well as your keyboard. There are plenty of keyboard shortcuts the platform offers to access its functions. Excel shortcuts work best for fast-working professionals like data entry experts and others. Plus, shortcuts work best for people with mobility issues as they can access all functions using the keypad only.
Inserting a row through keyboard shortcuts can save you productive time. Plus, you don’t need to put much manual effort into clicking on different options to use Excel functions. Learning all these shortcuts may take you some time. But it’s all about muscle memory. Once you get to know the shortcuts and apply them multiple times, they will be easier for you to implement.
3 Keyboard Excel Shortcuts for Insert Row
Inserting a row in Excel is simple; you just need to press some keys for that. Or you can directly add rows by finding and clicking the right options. However, using shortcuts can reduce the time you take to perform the tasks. Pressing some keys to add new rows is always a better idea than going through the lengthy clicking events.
On the other side, shortcuts improve the productivity of the Excel users. Whether it’s calculation shortcuts or functional shortcuts, you can increase your work productivity once you learn all these. But remember, you do not have to memorize all these shortcuts at all; they will come to you automatically. What you need to do is practice a little bit more.
Here are the top three shortcuts that you can use to add rows in your spreadsheets. Let’s get into them.
Insert a row using Ctrl + plus sign (+) or Ctlt + Shift + plus sign (+)
Suppose you have the following data showcasing your employee’ names and their joining date. There are 7 employees currently working for you. Their names (Column A) and date of joining (Column B) are mentioned.
Now, you need to add a row in 4 (selected in the image). So how would you do that?
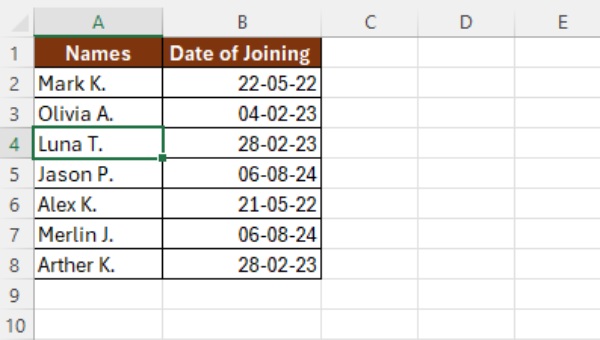
figure 1
Well, the following steps you need to follow to add 4 four using the keyboard shortcut.
First, select any cell in row 4 and press “Shift + Spacebar”
Once you press the keys, the entire row will get selected (refer to the following image)
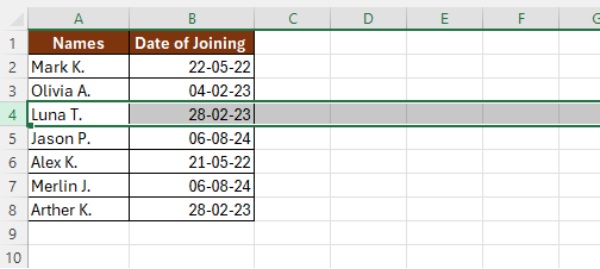
figure 2
While the entire row is selected, you now need to enter the following formula accurately using your keyboard.
Ctrl + plus sign (+) [if you are using a keyboard that has separate buttons for numbers on the right side]
Ctrl + Shift + plus sign (+) [this formula works on any regular keyboard that doesn’t have a separate numeric keypad]
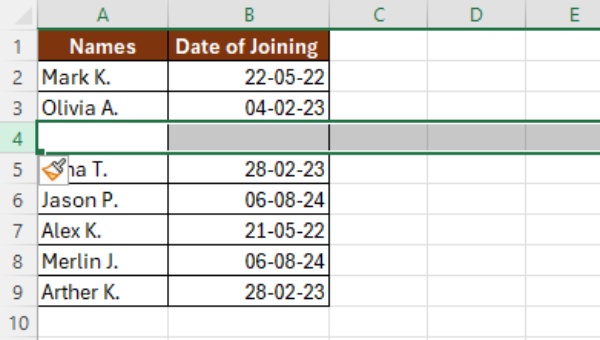
figure 3
After pressing the shortcut formula, all entries in row 4 will switch to row 5 (immediately next), and a blank row as row 4 will get created.
Now, you can see a brush icon below the blank cell; it’s a drop-down icon. Click on that. This will open up with three options (check the image below)
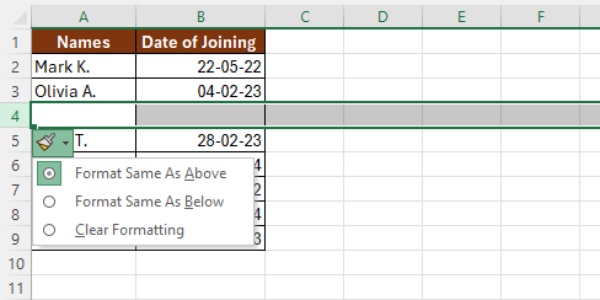
figure 4
- Format same as above: Format exactly at row 3 will be followed in row 4 when you click this.
- Format same as below: Format exactly at row 5 will be followed in row 4 when you click this.
- Clear formatting: Clicking this option is equal to removing all formats from row 4.
Insert a row using the “insert” dialog box
If you want a single formula to add rows to your database, then inserting a row via the “dialog” box is the right option for you.
Using the same data, you need to click any cell in row 4 (because you’re inserting row 4 here)
Once you click any cell in row 4, you need to press “Ctrl + plus sign (+)”
Apparently, a dialog box will come where you will be offered four options. Among them, select “entire row” and then “Ok.”
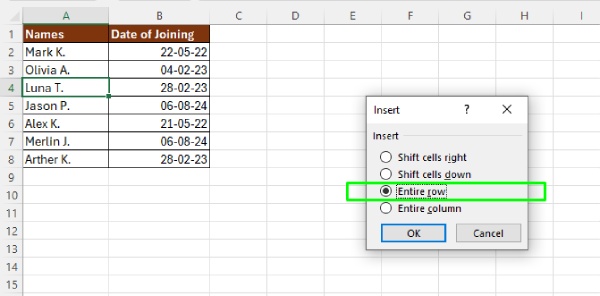
figure 5
Insert a row using Alt + I + R
A new row, row 4, will appear thereafter. You can see the same brush icon there. If you want to modify the format of your data, you can do that using the brush icon.
Well, if these functions do not work, you need to try “Ctrl + Shift + plus sign (+)” for that. This shortcut works in keyboards that don’t have a numeric pad.
As a data professional, you must know some quick tricks in Excel to make an impact. With time, Excel features have been upgraded, and now it supports some automation functions, too.
Therefore, now we have multiple Excel shortcuts for insert row to our database. Let’s have a demonstration.
Using the same data, we can add a row in the same place (row 4) using the “Alt + I + R” keyboard shortcut.
For this, you need to select the row first (press shift + spacebar), and then you can apply the formula.
As a result, a new row will be created as row 4 (same as figure 4)
Note: This formula only works on the latest versions of Excel. If you’re using older versions of Excel, then you must go through the earlier formula instead of this.